Tier 1 & Tier 2 User Dashboard
Note: This page has been split into multiple sections for better navigation. Please use the links below or the sidebar to navigate to specific topics.
Quick Navigation
- Dashboard Overview - Introduction and Submit New functionality
- Viewing Dockets - All Dockets, Closed Dockets, and Case 360 View
- Documents and Companies - Filed Documents and Company Information
- My Dockets - Managing your personal dockets
- My Items - My Filings, Companies, IPRA Requests, and Subscriptions
- Dashboard Tools - Advanced Search, Notifications, and Profile
Tier 1 & Tier 2 User Dashboard (Legacy Content)
Once you log in to the Public Portal, the system opens your Dashboard, which serves as your main workspace and navigation area.
From here, you can access your Dockets, filings, company records, and notifications based on your user type (Tier 1 or Tier 2).
- Tier 1 Users: Can log in immediately after registration.
- Tier 2 Users: Can log in once their registration has been reviewed and approved by PRC staff.
To log in, enter your registered email address and password, then click Sign In.
After a successful login, the system automatically redirects you to your dashboard.

Understanding the Dashboard
Your dashboard provides quick access to all major areas of the Public Portal.
Each tile or menu option represents a specific function, such as viewing dockets, submitting filings, or managing company information.
| Dashboard Functionality | Available To | Description |
|---|---|---|
| Dashboard (Home Screen) | Tier 1 & Tier 2 | Displays key activity summaries — dockets, filings, companies, and user actions. |
| All Dockets | Tier 1 & Tier 2 | View all public dockets in the system with search and filter options. |
| Closed Dockets | Tier 1 & Tier 2 | View dockets that have been marked as closed or resolved. |
| All Filings | Tier 1 & Tier 2 | View all public filings submitted to the Commission. |
| All Companies | Tier 1 & Tier 2 | View a list of companies registered within the system. |
| My Dockets | Tier 1 & Tier 2 | Tier 1 – Shows formal complaints and filings submitted by you. Tier 2 – Shows all dockets you have created or filed into. |
| My Filings | Tier 1 & Tier 2 | Displays filings submitted by you (Tier 1 – comments/IPRA requests; Tier 2 – formal filings included). |
| My Companies | Tier 2 Only | Lists companies you have registered or manage. |
| My IPRA Requests | Tier 1 & Tier 2 | Lists IPRA requests you have submitted with their statuses. |
| My Docket Subscriptions | Tier 1 & Tier 2 | Manage notifications for Dockets you are following. |
| Notifications | Tier 1 & Tier 2 | View alerts such as filing updates, hearing notices, and messages. |
| Profile | Tier 1 & Tier 2 | Update your contact information, email, phone, and password. |

Navigating the Sidebar
Use the left-side navigation panel to move between dashboard sections:
- Dashboard
- All Dockets
- Closed Dockets
- All Filed Documents
- All Companies
- Notifications
- Profile
Each section opens in a new view and provides search and filter tools to help you find the information you need quickly.
1. Submit New Button
Both Tier 1 and Tier 2 users can create new submissions from the “+ Submit New” button located at the bottom-right corner of the screen.
Clicking this button opens a menu showing all available submission options.

Tier 1 Users
Tier 1 users can use the Submit New menu to:
- Submit a Formal Complaint
- File into My Formal Complaint
- Submit Rulemaking Comment
- Submit Public Comment
- Submit IPRA Request

Tier 2 Users
Tier 2 users have extended filing permissions. They can initiate new dockets, submit filings, and manage company records.
To create a submission:
- Click the “+ Submit New” button at the bottom-right corner.
- Choose the required option from the list below.
| Action | Description |
|---|---|
| File a New Docket | Create and submit a brand-new docket (Docket). |
| File Into Existing Docket | Add documents or responses to an existing Docket. |
| Submit a Formal Complaint | File a formal complaint against a utility or company. |
| File Into My Formal Complaint | Add additional filings to a complaint you previously submitted. |
| Submit Rulemaking Comment | Provide feedback or input for an ongoing rulemaking Docket. |
| Submit Public Comment | Submit comments on non-rulemaking public Dockets. |
| Submit IPRA Request | File a Public Records (IPRA) request. |
| Register New Company | Register a company for future filings. |
| Request Company Management Access | Request management rights for an existing company (requires approval). |
2. View All Dockets
From the Dashboard, click All Dockets on the left-hand navigation menu to open the full list of dockets available to you.
Each row represents an individual docket record and includes searchable and filterable columns such as Docket ID, Docket Type, and Status.

Click the Docket ID link to open the Case 360 View.
This detailed view shows all Docket-related information, including parties, pleadings, service notifications, and comments.
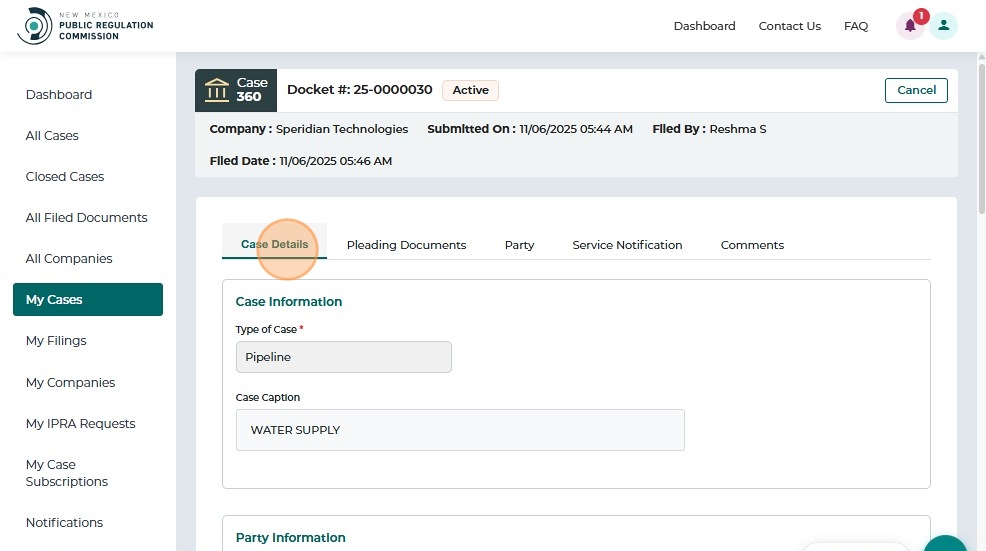
2.1 Case 360 Overview
The Case 360 View displays the complete information for a selected docket.
At the top of the screen, you can view the Docket #, Docket Status (e.g., Active / Closed), Company Name, Submission Date, Filed By, and Filed Date.
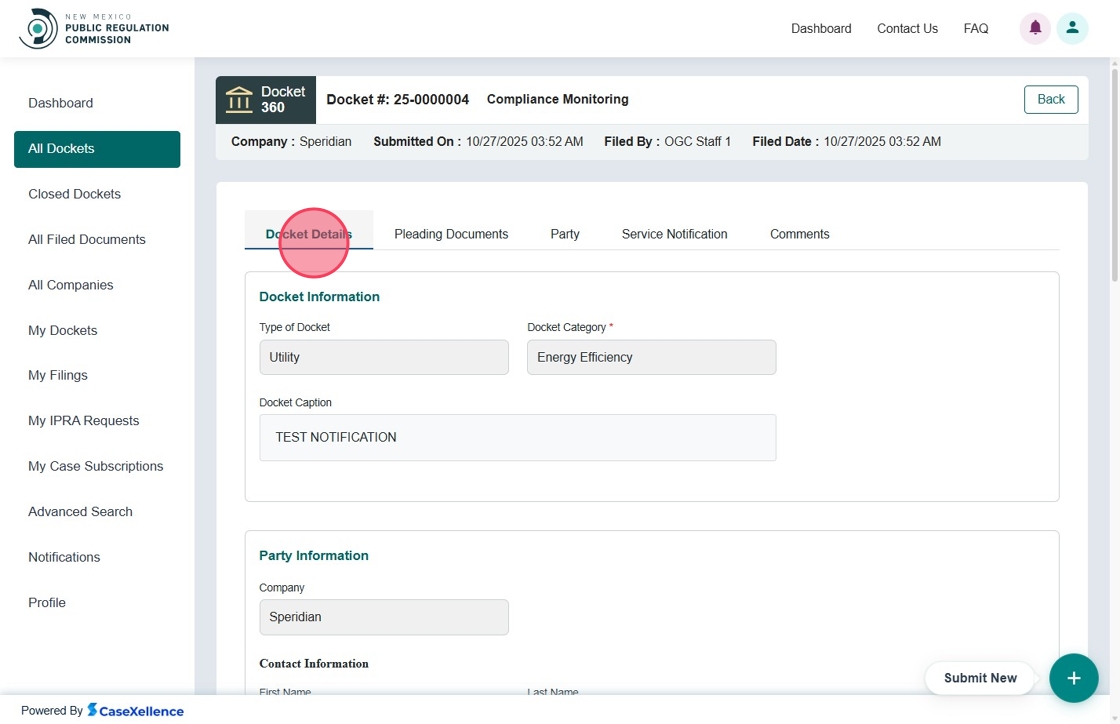
2.2 Docket Details Tab
This tab displays all read-only details about the docket such as Docket Type, Category, Caption, and Status.
It also includes Party Information, Contact Information, Lead Attorney Details, and Filer Details.

Additional parties and Notice Recipients appear further down the screen.

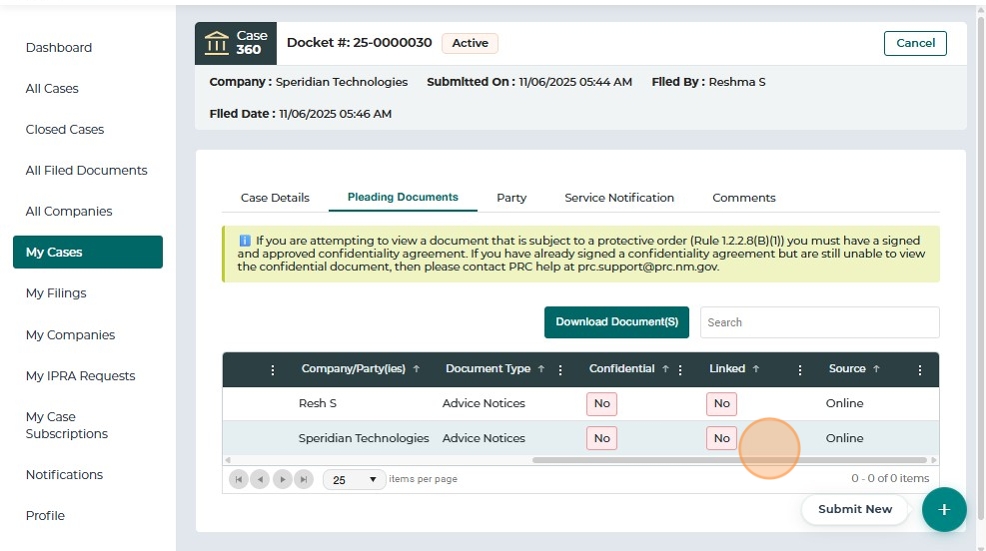
2.3 Pleading Documents Tab
This tab lists all supporting documents filed for the selected docket.
Each row shows the Document ID, Filed Date, Filer, Company / Party, and other filing metadata.

Click the Document ID link to view the document.
You can also check one or more documents and click Download to save them locally.

2.4 Party Tab
The Party Tab lists all parties linked to the docket, including their Name, Phone, Email, Mailing Address, and associated Company.

2.5 Service Notification Tab
This tab lists all service notifications related to the docket, including recipients and delivery details.
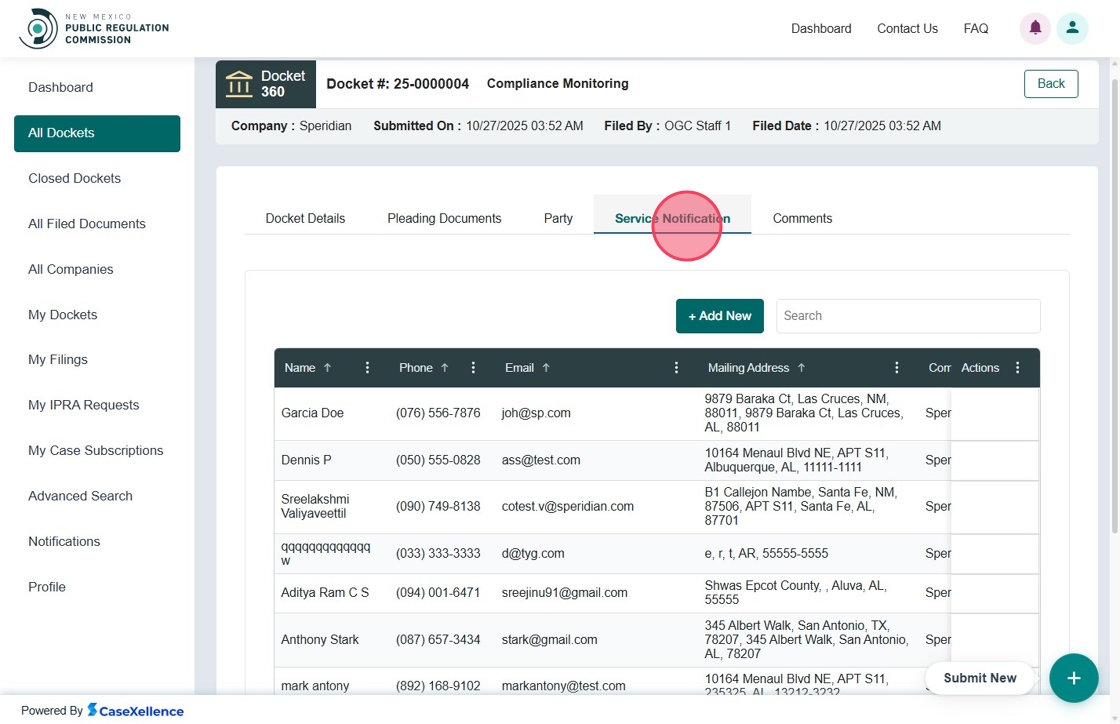
User can add new Service Notification by clicking on the Add New button.

Fill in the information in fields and click Submit
2.6 Comments Tab
The Comments Tab displays all comments linked to the selected docket, including Comment ID, Type, Date, and Status (e.g., Accepted, Pending, In Review).

Comment 360 View
Clicking a Comment ID opens the Comment 360 View, which displays all information related to that comment — including Comment Details, Contact Information, Attachments, and the Review Summary.
3. Closed Dockets Tab
This tab displays a list of the closed Dockets. Users can click on Docket ID and view Case 360 details but the Status will appear as Closed.

4. All Filed Documents
The All Filed Documents tab displays all documents filed under Pleadings for any docket.
It includes details such as Docket Number, Filed Date, Filed By, and Company Name.

Click the Document ID to open a document.
Within the document viewer, users can use the Download or Print options to save or print the file.

To view more actions, go to the Action column, click the three-dot menu, and select More Details to display additional options.

A side panel opens displaying additional details about the selected document.

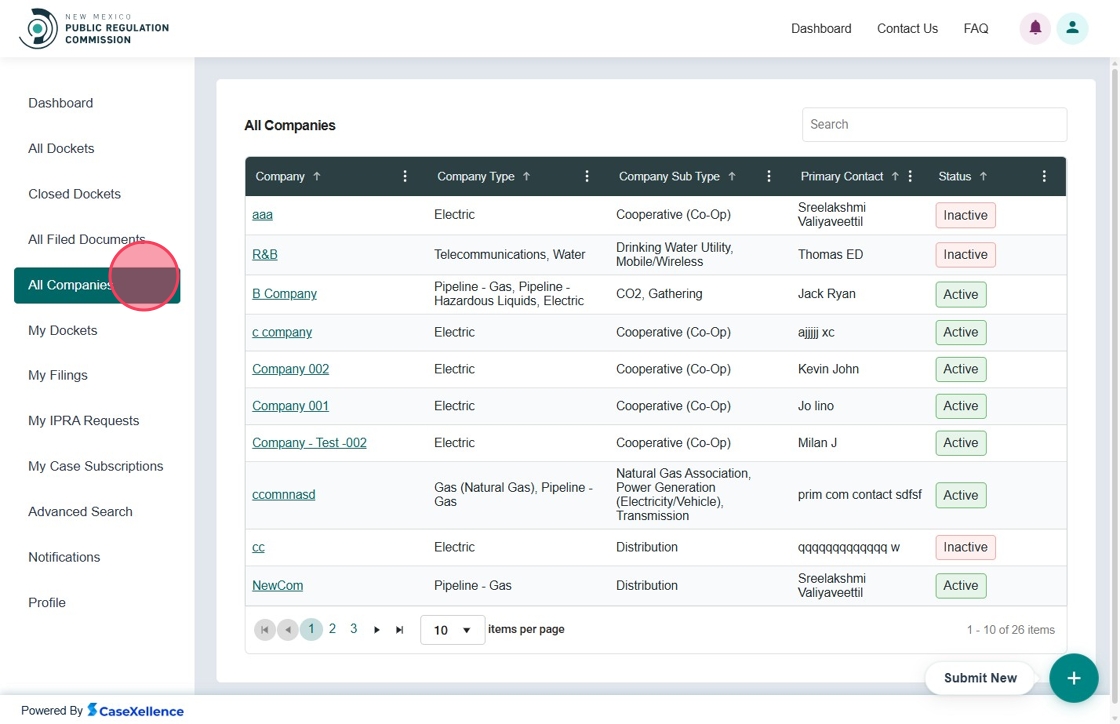
5. All Companies
The All Companies tab lists all registered companies and displays details such as Company Name, Company Type, Company Sub-Type, Primary Contact, and Status in a grid view.
5.1 Company 360 View
Clicking a company name opens the Company 360 View.
5.2 Company Details
The Company Details tab includes:
- Company Information
- Filer Information
- Company Address
- Industry Information

The Company Address section includes both Primary Address and Mailing Address.

The Industry Information section contains the Industry Type, Sub-Type, and additional optional details.

5.3 Dockets
The Dockets tab within the Company 360 View lists all dockets filed by the company, displaying the Docket Number, Docket Type, and other related details.
Each Docket ID is clickable and opens the Case 360 View.

5.4 Contacts
The Contacts tab displays all contacts added to a company, including their Name, Phone, Email, Mailing Address, and Status.

Add New:
User can add new Contact by clicking on Add new button, fill in the fields and click Submit button

Available Options
Users can navigate to the Actions column and click the three-dot icon to view available options: View, Edit, or Delete.

-
View: Opens a side panel displaying detailed contact information.

-
Edit: Opens a side panel where contact details can be modified.
Click Submit to save changes.
-
Delete: Displays a confirmation popup. Confirm to permanently delete the contact.

5.5 Comments
The Comments tab lists all comments submitted by the company, showing the Comment ID, Type, Date, and Status (e.g., Accepted, Pending, In Review).

5.5.1 Comment 360
The Comment ID is clickable.
Clicking it opens the Comment 360 View, which displays:
- Comment Details
- Contact Information
- Comment Text
- Attachments (if any)
- Review Summary

6. My Dockets
The My Dockets tab displays all Dockets created, filed, or submitted through the Public Portal.
Tier 2 users can file new dockets, submit formal filings, and file into existing Dockets — their My Dockets list reflects all related activity.
| Column | Description |
|---|---|
| Confirmation # | System-generated confirmation ID assigned when the Docket was created. The link opens Docket details. |
| Docket # | Official docket number assigned after approval or processing. |
| Docket Type | Type of Docket filed (e.g., Pipeline, Complaint, Rate Docket). |
| Docket Category | Category within the Docket type (e.g., Water, Gas, Telecom). |
| Docket Caption | Short title or description of the Docket. |
| Company | Company associated with the Docket or filing. |
| Filed By | Name of the user who filed the Docket. |
| Filed Date | Date and time the Docket was submitted. |
| Status | Current Docket status (e.g., Active, Closed, Pending Review). |
Once the docket is approved and processed by PRC staff, the Docket # appears in the list.


User Actions:
-
Click the Confirmation # to open the user’s original submission details.
-
Click the Docket # to open the official Docket detail page showing filings, Docket history, and related documents.
-
Use the Search Bar to filter Dockets by confirmation number, docket number, or Docket type.

Docket Details Tab
Selecting a Docket from My Dockets opens the Docket Details View, where users can review full Docket information, parties, filings, and notification options.
This view provides a complete 360-degree summary of the selected docket.
| Field | Description |
|---|---|
| Docket # | Official docket number assigned to the Docket. |
| Status | Current Docket status (Active, Closed, Pending). |
| Company | Company associated with the filing (if applicable). |
| Submitted On | Date and time when the initial filing was submitted. |
| Filed Date | Date and time when PRC accepted or recorded the filing. |
| Filed By | Name of the user who submitted the Docket. |
A Cancel button is available to return to the previous page.
The Docket Details tab displays the complete form submitted when the Docket was created, including:
-
Docket Information: Type of Docket (e.g., Pipeline), Docket Caption (short descriptive title)
-
Party Information: Details of the primary filing party
-
Lead Attorney Information: Assigned attorney details
-
Filer Information: Automatically populated with the logged-in user’s details
-
Additional Parties: Option to include more parties
-
Notice Recipients: Option to add individuals to receive filing notifications


Pleading Documents Tab
The Pleading Documents tab displays all filings and documents associated with the selected Docket.
Users can review document details, download filings, and verify confidentiality restrictions.
| Field | Description |
|---|---|
| Document # | Unique document identifier. Clicking the link opens the document (if public). |
| Document Title | Name or title entered by the filer during submission. |
| Filed Date | Timestamp indicating when the document was officially filed. |
| Filed By | Name of the individual who submitted the document. |
| Company / Party | The party or company associated with the filing. |
| Document Type | Classification such as “Advice Notice,” “Exhibit,” or “Motion.” |
| Confidential | Indicates whether the filing is confidential (“Yes” / “No”). |
| Linked | Shows if the document is tied to another filing or Docket component. |
| Source | Indicates where the document originated (e.g., Online). |

-
Users may select one or multiple filings using the checkboxes provided.


-
Once one or more documents are selected, click the Download Document(s) button.

A pop-up appears prompting:
Select how you want to download the documents:
- Individual
- ZIP
Choose the preferred option and click Download.


After completion, a success message confirms:
“Document(s) downloaded successfully.”

Party Tab
The Party tab displays all individuals and organizations associated with the selected Docket.
This includes parties added during Docket creation, manually added parties, attorneys, and company participants.
| Field | Description |
|---|---|
| Name | Full name of the party (applicant, petitioner, company representative, or attorney). |
| Phone | Contact phone number provided during filing. |
| Email address used for communication or service. | |
| Mailing Address | Physical or mailing address used for official notices. |
| Company | Displays the associated company, if applicable. |
This tab provides a consolidated view of all primary parties (Applicant, Petitioner, Respondent) and their contact details.

Service Notification Tab
The Service Notification tab displays all individuals and company contacts subscribed to receive updates for the selected Docket.
This includes parties added during Docket creation, manually added contacts, and company representatives linked to the Docket.
This tab allows users to:
- View all contacts who will receive notifications for the Docket
- Review recipients including Primary Filing Party, Additional Parties, Company Contacts, and Manually Added Contacts
- Validate mailing addresses and company associations
- Review notification status for each contact
| Field | Description |
|---|---|
| Name | Full name of the notification recipient. |
| Phone | Contact number of the recipient. |
| Email address where notifications are sent. | |
| Mailing Address | Physical or mailing address (auto-loaded or entered during filing). |
| Company | Company the recipient is associated with, if applicable. |
| Online User | Indicates if the recipient has an active PRC Portal login (Yes / No). |

Comments Tab
The Comments tab displays all comments or notes associated with the selected Docket.
These may include public comments, rulemaking comments, or internal notes, depending on the Docket type and system configuration.
This tab is designed to:
- Display all comments submitted to the Docket
- Provide transparency into comment-related Docket activity
- Allow users to track public or procedural commentary related to the docket
| Field | Description |
|---|---|
| Confirmation # | System-generated confirmation number for the submitted comment. |
| Comment Type | Identifies the comment type (e.g., Public Comment, Rulemaking Comment). |
| Submitted On | Date and time when the comment was submitted. |
| Status | Indicates whether the comment is Processed, Pending, or Rejected. |

7. My Filings
The My Filings tab displays all filing requests submitted by the logged-in user.
This includes filings for new dockets, existing dockets, formal complaints, and other submissions initiated through the Submit New menu.
- From the left navigation menu, click My Filings.
- The system displays a table listing all filings submitted by you.
| Field | Description |
|---|---|
| Confirmation # | Unique identifier assigned to the filing request. Clicking the number opens the filing details. |
| Accepted On | Date and time when Records Staff approved the filing request. |
| Submitted On | Date and time when the filing was submitted by the user. |
| Submission Status | Indicates whether the filing is Accepted, Rejected, or Pending Review. |

-
Click the Confirmation # (for example, FLG-CNF-0000025-25) to open the Public Filing Request detail page.

This page includes the following sections:
-
Filing Status
-
Request Details
-
Attachments


8. My Companies
The My Companies section is available to Tier 2 users who have registered a company or been granted company management access by PRC staff.
This page displays all companies that the logged-in user is associated with.
| Field | Description |
|---|---|
| Confirmation # | Clickable confirmation ID generated when the company registration request was submitted. Opens the company details. |
| Company | Name of the registered company. |
| Company Type | Industry type (e.g., Water, Gas, Electric). |
| Company Sub-Type | Subcategory under the main type (e.g., Drinking Water Utility). |
| Primary Contact | Person designated as the main point of contact for the company. |
| Submitted On | Date and time when the company registration request was submitted. |
| Status | Indicates whether the company registration is Active, Pending, or Rejected. |
Users can perform the following actions on this page:
-
View companies they have registered
-
View companies they manage
-
Track submission status (Active / Pending / Rejected)
-
Click the Confirmation # to view full company details
-
Submit new company registrations using the Submit New (+) button


When a Tier 2 user selects a company from My Companies, the system opens the Company 360 View, displaying the full details submitted during registration.

At the top of the page, the following fields are displayed:
| Field | Description |
|---|---|
| Company Name | Registered name of the company. |
| Status | Indicates whether the company is Active, Pending, or Rejected. |
| Created On | Date and time when the registration was submitted. |
| Created By | Name of the user who submitted the registration. |
| Email / Phone | Contact details of the filer. |
A Cancel button is available to return to the previous list.
Company Details
The Company Details tab contains multiple sections:
-
Company Information
-
Filer Information: Displays the details of the user who registered the company
-
Company Addresses
-
Primary Company Contact
-
Additional Company Contacts
-
Industry Information
-
Additional Information


Dockets Tab
The Dockets tab displays all Dockets — including formal complaints, docket filings, rulemaking, and other Docket types — associated with the selected company.
Key notes:
- Users cannot create a new Docket from this screen; they can only view existing company-linked Dockets.
- When the user clicks Dockets, the system displays a table of all related dockets.
| Column | Description |
|---|---|
| Docket # | Clickable docket number that redirects to the Case 360 page. |
| Docket Type | Type of Docket (e.g., Formal Complaint, Pipeline, Transportation, etc.). |
| Filer Name | Name of the individual who filed the Docket. |
| Source of Request | Indicates whether the Docket was filed Online, by PRC Staff, or Migrated from legacy records. |
| Assigned Users | PRC staff members assigned to handle the Docket. |
| Status | Current status of the Docket (e.g., Active, Closed, Pending). |
Search Functionality:
Users can search for Dockets using any keyword.
View Docket:
If one or more Dockets exist, clicking the Docket # opens the respective record in Case 360.

Contacts Tab
The Contacts tab displays all individuals linked to the selected company, along with their contact information and status.
| Field | Description |
|---|---|
| Name | Full name of the company contact. |
| Phone | Contact’s phone number. |
| Contact’s email address. | |
| Mailing Address | Correspondence address for the contact. |
| Status | Indicates if the contact is Active or Inactive. |
| Actions | Options to View, Edit, or Delete a contact. |

View Contact Details
- Select the Contacts tab.
- Click the three-dot menu under Actions.
- Select View.

A read-only popup appears, displaying:
- Name
- Phone Number
- Physical / Mailing Address
Click Submit to close the view.

Edit a Contact
- Select Edit from the Actions menu.
- Update the required fields:
- First Name
- Last Name
- Phone Number
- Address Line 1
- City / State
- Postal / ZIP Code
- Click Submit to save changes.
The system immediately updates the contact and refreshes the table.

Delete a Contact
Deleting a contact marks them as Inactive and removes them from active company communication lists.
- Select Delete from the Actions menu.
- A confirmation popup appears: “Are you sure you want to delete this Contact?”
- Click Yes to confirm.
- The contact is removed from the active list, and the Status changes to Inactive.


Add a New Contact
- In the Contacts tab, click + Add New.

-
Fill in the required fields:
- First Name
- Last Name
- Phone Number
- Address Line 1
- City
- State
- Postal / ZIP Code
-
Click Submit.
The new contact appears immediately in the Contacts table with Active status.


Comments Tab
The Comments tab displays public comments submitted for the selected company.
This applies when the company is involved in docketed matters where public input or rulemaking comments are accepted.
| Column | Description |
|---|---|
| Confirmation # | Unique confirmation ID for the submitted comment. Clickable to open details. |
| Comment Type | Type of comment (e.g., Public Comment, Rulemaking Comment). |
| Submitted On | Date and time when the comment was submitted. |
| Status | Status of the comment (Received, Accepted, Rejected, etc.). |

9. My IPRA Requests
The My IPRA Requests tab displays all Inspection of Public Records Act (IPRA) requests submitted by the logged-in user.
The grid provides a quick overview of each request, including the Request ID, Date, Time, Requester Name, and Status (e.g., Pending).

Clicking on the IPRA Request ID redirects the user to a 360° view of the request, which includes the IPRA Details and Production Documents tabs.
The IPRA Details tab displays all request-specific information.

The request view also includes a Request Details section and a Note to Requestor panel for PRC staff communication.

For detailed IPRA Process, refer to the Submit IPRA Request guide.
10. My Docket Subscriptions
The My Docket Subscriptions screen allows Tier 2 users to view and manage all Dockets they have subscribed to for automated notifications.
Users can add new subscriptions, update existing ones, or remove subscribers they previously added.
- From the left dashboard menu, click My Docket Subscriptions.
- The system displays a list of all Dockets and subscribed recipients.
| Column | Description |
|---|---|
| Docket # | The Docket/docket number subscribed to. Clicking opens Docket details. |
| Name | Name of the subscribed individual (yourself or another contact). |
| Phone | Contact number of the subscribed individual. |
| Email address where notification alerts are sent. | |
| Actions | Options to Edit or Remove a subscription using the three-dot menu. |

Add a New Subscription
- Click + Add New Subscription.
- Enter or search for an existing Docket Number.
The system validates the docket number entered.


- Select Who is Receiving Notices:
- Self
- Someone else’s behalf
If Self is selected, your user details auto-populate.

Click Submit.
A success message appears: “Subscription added successfully.”

Edit a Subscription
- From the Actions column, click the three-dot menu and select Edit.
- A side panel appears showing the subscriber information form.
- Update required fields such as:
- First Name
- Last Name
- Phone Number
- Address
- City / State / ZIP
- Click Submit to save.
A confirmation message displays: “Subscription details updated.”

Remove a Subscription
- In the Actions column, select Remove.
- Confirm the deletion in the popup prompt: “Are you sure you want to delete this notification?”
- Click Yes to confirm.
The system displays: “Subscription is Removed.”
If no subscriptions remain, the page displays “No Records Available.”

Add Subscription for Another Individual or Company
- Click + Add New Subscription.
A right-side panel opens. - Enter the Docket Number and select it from the search results.
- Choose Someone else’s behalf.
- Choose whether the subscription is for an Individual or a Company.
The form fields adjust accordingly. - Complete all required details and click Submit.
A success message confirms: “Subscription added successfully.”

11. Advanced Search
This tab allows Tier 1 & Tier 2 users to search for Dockets or Documents with different filters.

For detailed information, refer to the Advanced Search guide.
12. Notifications
The Notifications screen allows users to view all system-generated alerts related to their subscribed Dockets.
These notifications ensure users stay informed about important updates such as new filings, hearing schedules, or status changes.
- From the left navigation menu, select Notifications.
- The system displays a list of all alerts associated with your account.
Each notification record includes:
-
Title – A brief description of the event
-
Description – Detailed information about the event
-
Received On – Date and time when the notification was generated
-
Actions – Indicates whether the notification has been viewed or acknowledged


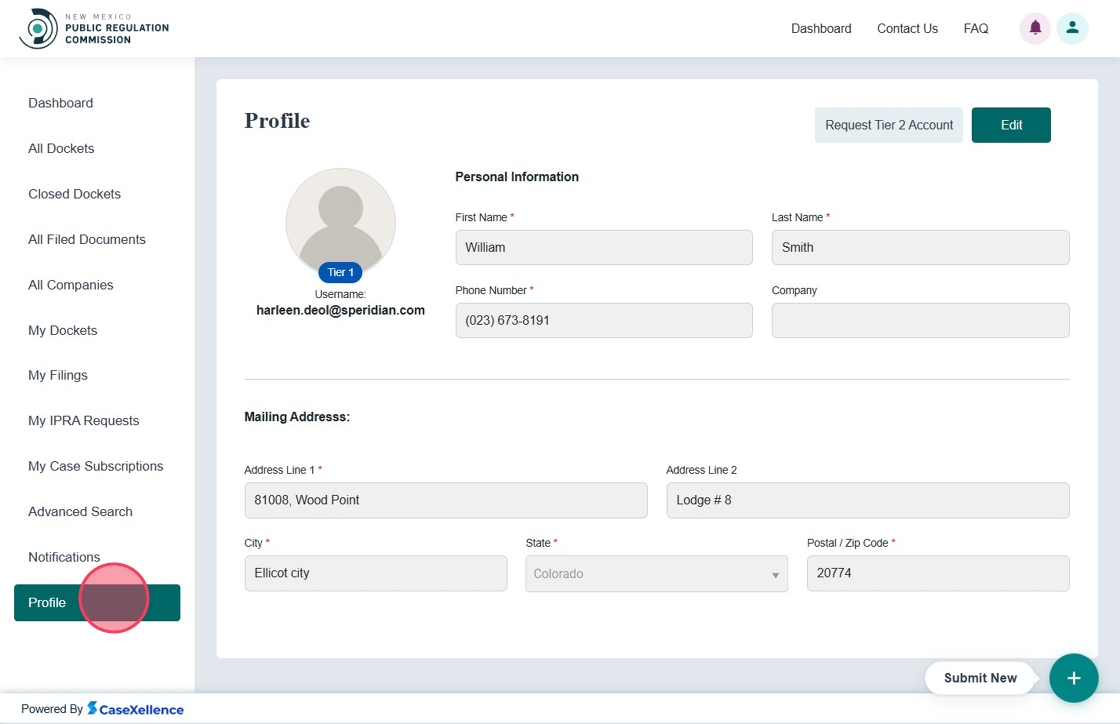
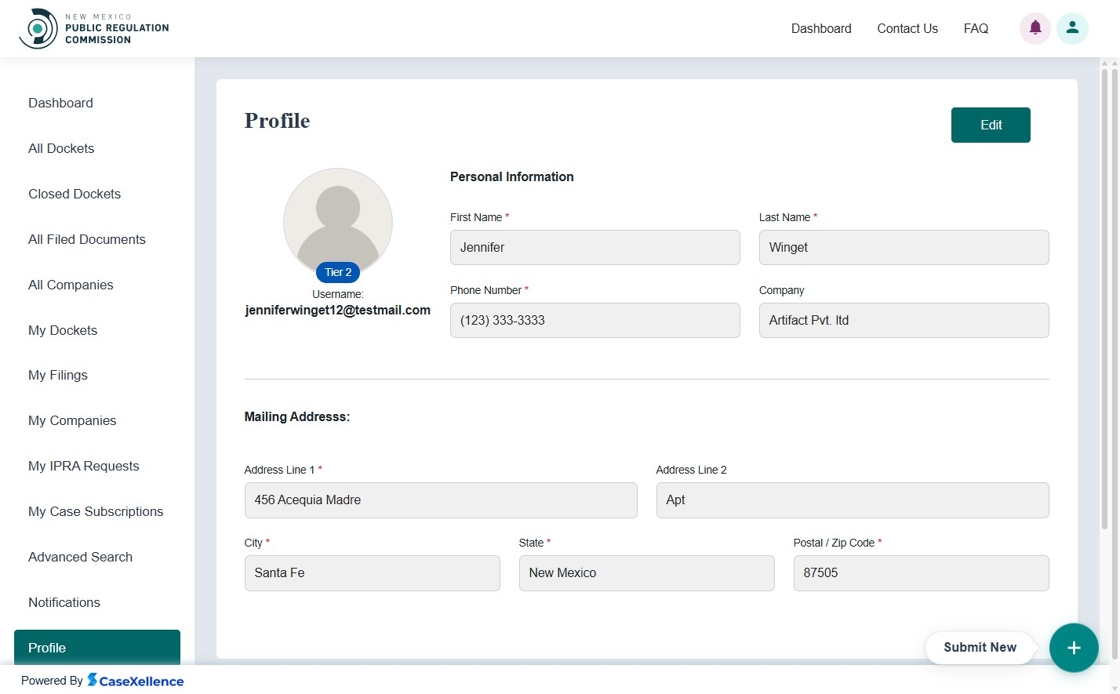
13. Profile
The Profile tab allows Tier 1 & Tier 2 users to view their Profile Information and Edit the existing Address. Tier 2 Users have a Request Tier 2 Account button as well
Tier 1 User:
Tier 2 User:
For the full process of editing and updating your profile, refer to the Update User Profile guide.
For detailed instructions on requesting Tier 2 access, refer to the Request to Become Tier 2 User guide.